Saturday, January 13, 2018

M-32 Tank Recovery Vehicle - Italeri 1/35 (Part 1)

The Italeri M-32 is a older kit and needed some updates.  The large hatch hull was not common version and the turret dimensions were not accurate.  The upper hull was replaced with a Tank Work Shop M4A1 Direct Vision hull, and the lower hull was replaced with one from Dragon.  The transmission cover was from the kit.


I started with the lower hull and VVSS suspension.  The Italeri VVSS brackets lacked details and was replaced with brackets from Dragon.  They needed detailing too.  Bolt heads were added to the return skids and to the return arm rollers.  Grease fittings were added to the top of the bracket under the skid.  The skids were too thick and thinned by sanding and scraping.  Four mounting holes were drilled into the front of the bracket.  I used two types of road wheels - the spoked wheels are from the kit and the pressed spoked wheels are from Dragon.  These needed the 10 rivets around edge to be added.  Both road wheels had a mold seam line that needed to be removed.  To do this, they were mounted on a drill using a tooth pick and sanded smooth with 100 grit paper.


Since the M32 has an open top and the hatches were going to be open, the interior provided with the kit was sparse and needed to be detailed - no driving compartment was included and the turret and crew compartments had some basic details.

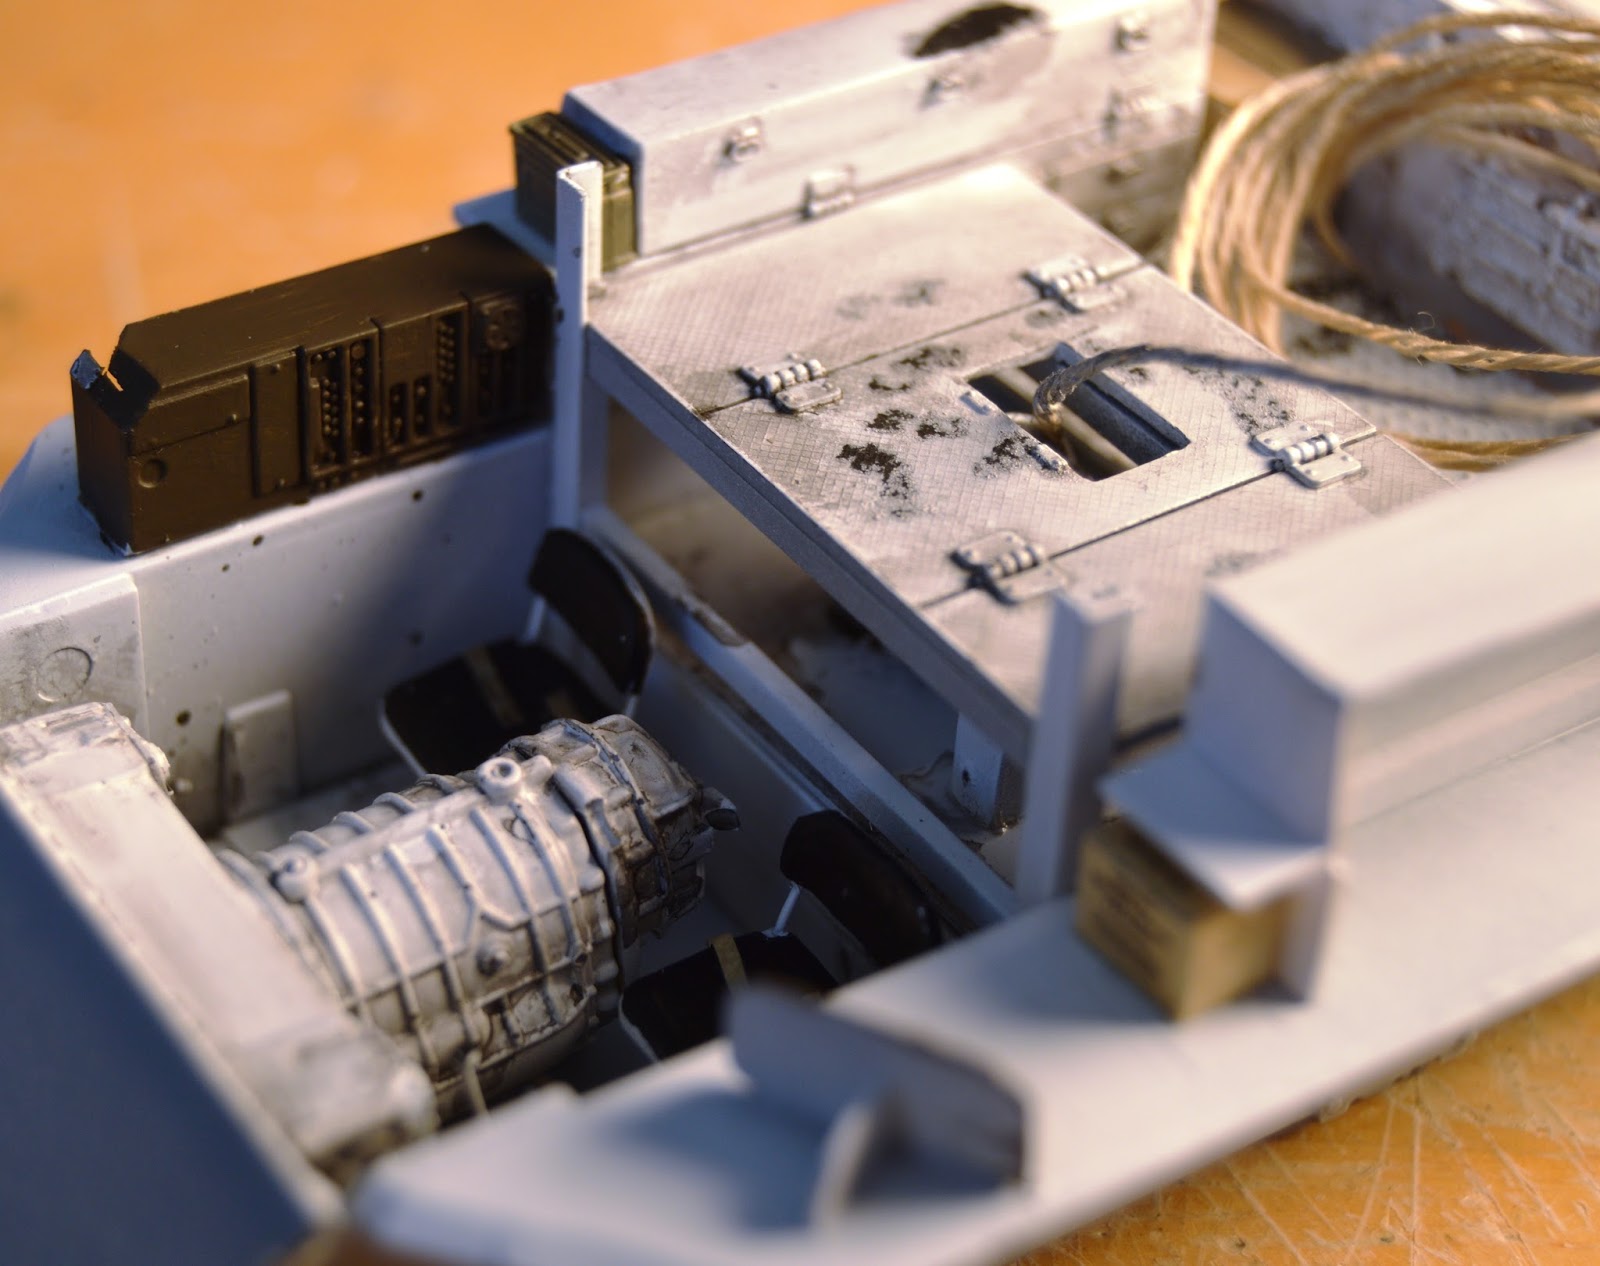
For the drivers compartment, a transmission, floor, dashboard, radio, and seats were added.  The transmission was casted from an M-10 kit.  The floor, dashboard, and seats were made from stryene and green epoxy putty.  The radio was from the spare parts box.  For the crew compartment, the machinist tools boxes, firewall, winch, and floors were added.


A basic winch was scratch built too.  Since the winch was going to be covered, not much detail was needed.  The floor was modified and the hatch was cut open.


The floor was primed and painted black.  The salt technique was used to weather the floor before it was painted white.  I think it gives a good effect for worn.


The turret was next.  The back of the turret was too narrow in the back by 0.3".  Thin wedges were made from 0.04" Styrene.  The wedges were glued to the existing turret. 

A paper template was made for the sides of the turret.  They were made from 0.04" styrene and glued to the turret.  I left the inner turret walls in place.  

The back plates were fitted, glued, and sanded.  The turret was bolted to the upper hull.  Bolt heads were added to the turret.  A paper template was used to make sure the bolts were evenly spaced.


Detail was added to the interior of the turret.  The rear pulley, hatch, and fold down seat were  missing - they were scratch built.  The mortar ready rounds, fire extinguisher, crew seats were added and detailed.


Sunday, March 12, 2017

1/72 Revell - USAF F-104A

This is another older kit that I picked-up a garage sale.  The kit was missing a few parts including the exhaust nozzle and the wing tank mounts.


The cockpit, ejection seat, and the instrument panel were detailed.  Small disks were punched form 0.010 styrene sheets to form the dials and gauges.  Styrene was used to make the head rest and seat cushions.  Copper wire and metal foil was used to make the seat belts and the ejection handles.  They were primed with Tamiya gray and painted with Vallejo Acrylics.


The completed ejection seat.


The kit was a straight forward build.  Details were added to the wheel wells and the wing tank mounts were scratch built.


The canopy was polished and dipped in Future Acrylic Floor wax.  Then is was masked and painted.  The results look pretty good.


The engine nozzle was made from a plastic tube and styrene strips.


The decals were printed on a Alps printer.


Here is the finished model.


Friday, March 3, 2017

1/72 Airfix - F-86D

This is an older kit that I got a garage sale.  It was missing a few parts - cockpit, fuel tanks, landing gear, air intake, air brakes, and an exhaust nozzle.  I decided to use it as a test build for AK Interactive's Xtreme metal Paints.


I started by scratch building the cockpit details.  The ejection seat was detailed with brass shim stock and plastic.  Seat belts were added, along with handles and stick.  The instrument panel was made from plastic card stock and detailed with small plastic disks punched from .010 styrene.


The canopy was buffed and wet sanded and then dipped in Future Floor wax.  This was my first time using this technique and it worked out really well.  The engine exhaust was made from the spare parts box and plastic strips.  The rest of the model went together very quickly.  The seam along the fuselage was puttied and sanded smooth.


The model was masked and primed using Tamiya grey primer from a rattle can.


I wanted to test the Xtreme Metal paint finishes.  I first applied the paint directly to the primer,  I masked half the plane and put down a coat of aluminum.  I used dark and dura aluminum for different planes.  The paint is very thin and it takes several coats to get good coverage.  The paint dries very quickly.


On the other half of the model, I sprayed the satin black that was recommended by AK Interactive.  The black paint was also very thin.


Here is the model.  I couldn't really tell any difference between putting the Xtreme metal over the satin black or straight on to the Tamiya primer.  The panel with the dark and dura aluminum do stand out nicely.  The anti glare panel was paint with Testors flat olive drab and the nose was painted with flat black.


The model with the decals completed.  To set the decals, I over coated the completed model with Humbrol Satin.  This was a mistake. It left the model with an uneven pattern.


The decals were older and didn't set as well as I hoped.  The USAF has a clear outline on the wing.  I tried to use some acetone to dissolve the decal to minimize the effect, but is started lift the paint instead.

Here is the finished model.


Monday, July 11, 2016

M4A3E2 Jumbo Sherman - 1/35 Tamiya

This model was started in Feb 2016.  It's the old Tamiya Jumbo kit.


The turret was not correct and it required a lot of modifications.  Two part putty was used to increase the bulk of the turret.  The commander copula was removed and a plastic ring was added as a support.  I used Surfacer 500 to add texture the turret.  Casting numbers were added to the front and sides of the turret.  A weld bead was added too.


The transmission cover was also bulked up using two part putty.  Surfacer 500 was used again to add texture.


Next, I worked on the road wheels and bogies.  Most M4A3E2's used a weld spoked road wheel, so I cut inserts from 0.005 sheet styrene.  There are 12 road wheels and each wheel needed 5 inserts - that's 60 inserts.  The effect looks good.

The bogies were detailed with mounting holes and bolts.  Bolts were also added where the transmission cover meets the hull.  To remove the seam lines on the road wheels, I mounted the wheel on a drill and sanded the wheel until the seam was gone.

I detailed the hatches.  The periscope holders were fabricated from sheet embossing aluminum.  Pads and handles were added.


This a close up of the details added.  There are the casting numbers on the turret, the weld beads on the added front and side armor.  Sand rails were added and putty was added for the welds.


Saturday, February 14, 2015

M4A1(76)W Sherman - 1/35 Dragon

This project was started in July 2014.  It's the 1/35 Operation Cobra by Dragon.  It was an interesting kit to build, and it required a lot of detail work.


I started with the boogies and road wheels.  I removed the seam lines on the road wheels, 4 mounting holes were drilled on the front side of the boogies, rivets were added to the return skids, and 12 pop rivets were added to each of the road wheels.  The drive sprocket was too narrow for the tracks.  I added a thin plastic shim to widen the sprocket.  I added 8 hex head bolts to the idler wheel bracket.  The sand rail was made from 0.015 plastic strip.


Weld seams were made by coating thin plastic rod with liquid cement.  When the plastic was soft, it was shaped with a hobby knife.  Welds were added to the tow hitch and around all the filler protectors, and drain holes were also added.

On the upper hull, all mounting holes were plugged with stretched sprue, and all grab handles were removed and replaced with wire.  The lifting lugs on the hull and turret were replaced with bent paperclips.  Sand rails were replaced with plastic strips.  Tied down clips were made and small plastic disks.  The rear storage rack was fabricated from brass shim stock.


Casting numbers were added to the turret.  The large numbers were shaved numbers from the sprues. Also,  Archer transfers were used.  The rear air vent was removed and the space was filled with plastic sheets and putty.  Mr. Surfacer was used to texture seams.  The grab handles on the side of the turret were made with wire.


The were the hardest part of the build.  They were assembled using a jig made out of craft sticks.  It took a long time to clean each of the 3 parts that make up one link.  The tracks were painted black, and the metal parts were dry brushed metallic grey track and many washed of rust were applied.


The tank was primed and pre-shaded with black.  The tank was painted OD.  All the decals were printed on an ALPS printer.  It was given multiple black washes and weathered with pastels.

The crew as made from a combination of Tamiya, Dragon, and MiniArt figures.  The 10-in-1 C-Ration boxes were constructed from heavy weight paper and printed on an ALPS printer.  The .30 cal ammo boxes are made from plastic stock.  The expended 76 mm casing were made from brass rod drilled out on an Unimat lathe.


The model was finally finished in February 2015.